Mail Presort Suite
Comprehensive mailing presort software
Many BCC Customers are signed up to use our Informed Visibility® based mailpiece tracking service Track N Trace®. This service groups up Informed Visibility scan data by job allowing you to track each mailing as it moves through the postal system. One of the most important features is the ability to generate various reports to more quickly and efficiently analyze the scan results from Informed Visibility. Nearly every Track N Trace customer uses this functionality to some extent. These reports vary from simple looks at the overall delivery speed of the job, to more in depth looks at specific problematic mailpieces or facilities and how they may have affected the overall deliverability of the mailing. Most customers generate these reports on demand as they look over jobs. One of our most common requests in support related to Track N Trace is a way to generate these reports regularly without having to log into the site and select the specific job you want a report on. The Report Scheduling functionality does just that, so this month we are going to discuss how to use this feature to keep up to date on multiple jobs day after day.
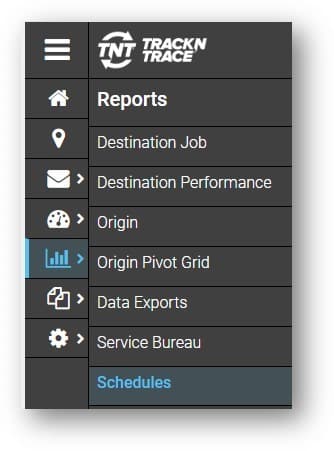
The Schedules wizard can be found under the Reports tab on your Track N Trace site page. This page will display any schedules that are set up, their name, how reports are to be delivered, the format of the reports and the current status of that schedule. If you have any set up you can view these details, and edit the schedules using the Edit button on the far-left side of the table. To set up a new schedule, click “New Schedule”, this will launch the Schedule wizard.
Note: – The Edit button only appears if you have a current schedule setup. If this is your first time viewing this page, only the “Add” button will show.
The first tab, Schedule, of the New Schedule wizard allows you to create the name of your Schedule. Choose a name that is somewhat recognizable because if you set up multiple schedules, it is important to be able to tell the difference between them when trying to update or disable them. Secondly, you can see if this schedule is currently Suspended. Suspended schedules do not generate any reports until they are turned back on. Lastly, and potentially most importantly, you can set how often you would like to Receive reports. Initially you will be presented with two radio buttons: “After Each USPS® Scan Update” and “Scheduled Intervals.” After each scan update will produce new reports four times a day, every time we get data from Informed Visibility. These four times are 6am, 10am, 2pm and 6pm EST. These are the times when data is pulled down from Informed Visibility. As the Track N Trace system needs time to process the data, the scheduled reports will not show up right at these times, but slightly after once the scans have been processed and correctly attributed to each job. Switching over to Scheduled Intervals allows you to select any day(s) of the week and any of these four times to receive reports. You can set it up to generate reports at multiple times on multiple days or just at one time, one day a week. Once you set the timing for your reports, proceed to the next tab, Reports.

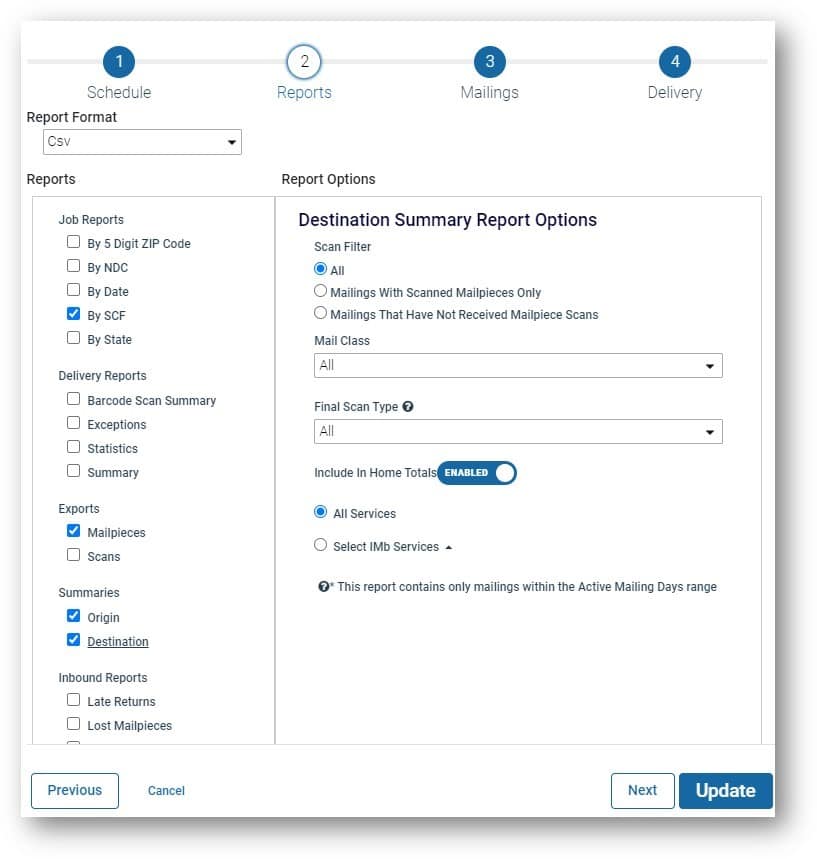
The Reports tab allows you to choose both which reports to generate, and the format. It is only possible to set a single format for all the reports the schedule will generate so be careful to select the appropriate format. In some cases, it will be best to set up multiple schedules to ensure each report comes out in an easy to digest format. Getting Data exports as a PDF for example, will produce reports that are not terribly conducive to analysis. I recommend PDF for the Job, Delivery, Summary, and Inbound reports, but use CSV or XLS(x) for the Exports. Each report selected will be generated for every job selected on the next tab, Mailings. Once you have selected all the reports you want, proceed to the Mailings Tab.
On the Mailings Tab, first set how long Mailings are considered active for in terms of this schedule. In other words, you will be setting a timeframe for which reports will be generated. This will be calculated based on the Mailing Date of the job(s) in question. So, if we leave it at 30 days, a job mailed on October 1st will stop generating reports on October 31st. In most cases 30 days should be more than enough for most mailings. Next, you are presented with the Included Mailings radio buttons. Leaving it as All Mailings will generate one of each report selected on the Reports Tab for each job on your Track N Trace site that is less than 30 days old. Switching to Select Mailings will allow you to select individual mailings to be included in the schedule. You also then have the option to get individual or group reports. The downside to selecting each mailing manually is that you will regularly need to update your schedule as jobs will eventually each stop receiving scans as all the mailpieces are delivered. The downside to selecting All Mailings is that you will receive reports for every single job. Reports will only be generated for a given job if the scan information has been updated since the last data dump. So, if a job received scans during the 6am data dump, a report will be generated. If that same job does not get any new scans at 10am, then a new report will not be generated. Once we have selected the timeframe and reports for the schedule, move on to the last tab, Delivery.
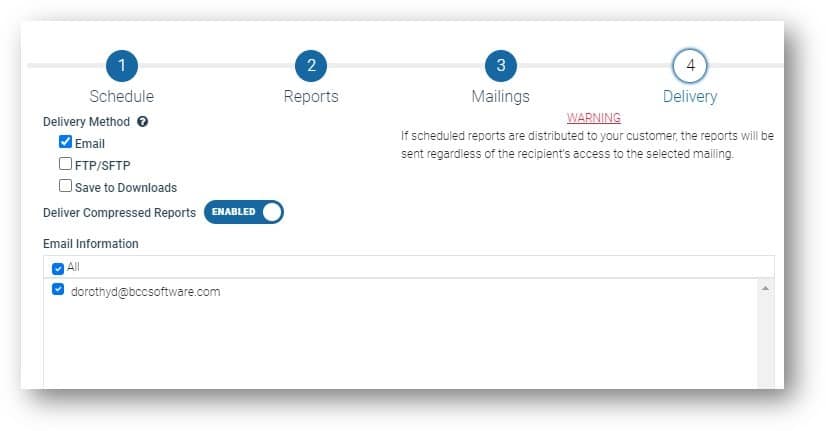
This final tab allows you to set up how reports will be generated and sent to you or your customer. Three methods are available. First is Email, which can send the reports directly to the recipient(s) you add below. You must have at least one email on this list, and thus cannot remove the last entry without adding a new email first. Second, you can also have the reports sent directly to an FTP or SFTP site. For this option you will need to set the host, credentials and port to be used for this FTP site. You do include the ability to test this connection for plain FTP sites. Your last option is to save the reports to the Data Downloads tab of the Track N Trace site. This will add these reports to that page where they can be directly downloaded using your web browser. With both latter options the user who wants the reports will have to go out to the FTP or Track N Trace site to check for and download the reports. Once this last tab is set up, click Schedule to save this schedule and activate it. Note: If “Suspended” is checked, the schedule will not activate.
We hope this helps you use this often-overlooked functionality in Track N Trace. This tool is very powerful and can make the process of analyzing and reporting on your Track N Trace jobs that much easier.
As always if you have any questions or need any assistance with this feature please reach out to Customer Support at 800-624-5234 or tech@bccsoftware.com.
Discover how BCC Software can help you implement the strategies discussed in this article. Our experts are ready to guide you through your postal optimization journey.